Forms in Html in Detail
Before we are going to understand How to make HTML forms , First we have to understand Why and where we use HTML Forms.

You were definitely seen Forms at many places over internet , Forms generally used at client side so that client sent data to server site. at many websites you can see dedicated contact pages where you can raise your queries by Putting your details(Name ,Phone,Address etc) in forms .

As webdeveloper, In any situation when we need user input, then we can use Forms.
To be very honest HTML forms is one of the most usefull and important concept. that why its very important to understand the concept behind Forms.
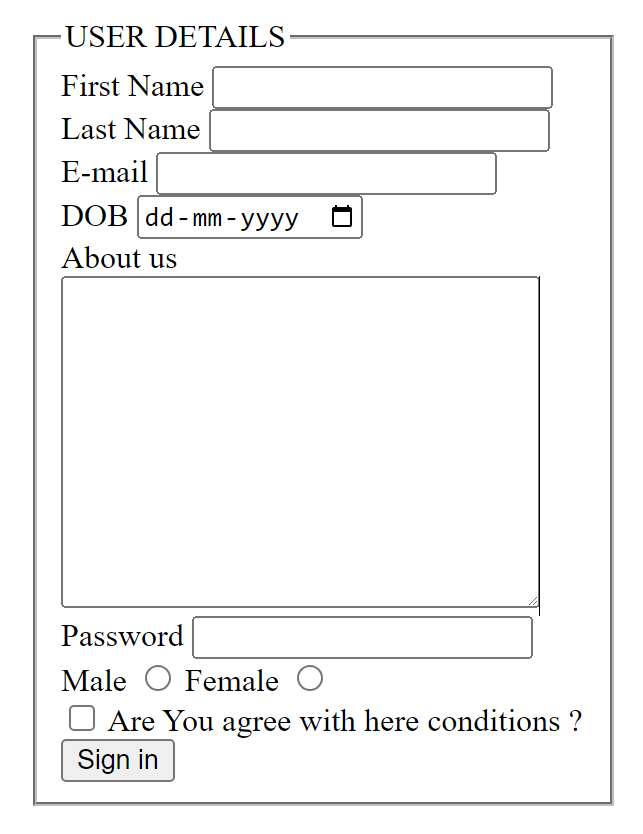
Making Our First form
To make simple form first we have to use <form> tag , then inside it we can put extra elements like <input> <label> etc tags according to our need. you don`t need to worry about these elements, we are going to Discuss about these elemets one by one in detail.
- <forms> :The
<form>tag is used to create an HTML form that allows users to input data. It encloses various form elements like text fields, checkboxes, radio buttons, etc. - <input> :The
<input>tag is a versatile element used to create various types of form controls, such as text fields, checkboxes, radio buttons, etc. Thetypeattribute is crucial, as it determines the specific type of input control. We make <input> tags inside <Form> tag - <label> :The
<label>tag is used to associate a text label with a form control, making it more accessible. It helps improve user experience by allowing users to click on the label to focus on or select the associated input. - <textarea>:This tag is used to put multiline text in form , it allows the user to put long text details like about us , query etc with this tag we can use cols and rows attributes for defining initial dimensions.
<!DOCTYPE html>
<html lang="en">

<head>
  <meta charset="UTF-8">
  <meta name="viewport" content="width=device-width, initial-scale=1.0">
  <title>Document</title>
</head>

<body>
  <form method="" style="margin: 5rem;" >
    <fieldset >
      <legend>USER DETAILS</legend>
      <label for="Fname">First Name</label>
      <input type="text" id="Fname" name="Fist Name">
      <br>
      <label for="Lname">Last Name</label>
      <input type="text" id="Lname" name="Lst Name">
      <br>
      <label for="email">E-mail</label>
      <input type="email" id="email" name="E-mail">
       <br>
       <label for="DOB">DOB</label>
       <input type="date" id="DOB" name="DOB">
       <br>
      <label for="About">About us</label>
      <textarea name="About" id="About" cols="30" rows="10"></textarea>
      <br>
      <label for="password">Password</label>
      <input type="password" id="password" name="password">
      <br>
      <label for="male">Male</label>
      <input type="radio" name="gender" id="male">
      <label for="female">Female</label>
      <input type="radio" name="gender" id="female">
       <br>
       <input type="checkbox" id="chk1">
       <label for="chk1">Are You agree with here conditions ?</label>
       <br>
       <input type="submit" value="Sign in">
    </fieldset>
  </form>
</body>

</html>- <fieldset> : With This tag we can make border line around Form , for this we need to put all forms details inside <fieldset> tag as show in above example, and For form title we can use <Legend> tag.
- If you look carefully at the above example- ,you will get to know One thing. inside each <input> tag we define name attribute ! but why ? this name is medatory to mention because we use this data at serversite to identify which data is comming from user
- If we want to ask a question from the user by giving multiple options in form, and we want to make a feature that the user can choose only one option of them.
for this feature we need to set same name of all input, as sown in example-
<label for="male">Male</label>
      <input type="radio" name="gender" id="male">
<label for="female">Female</label>
<input type="radio" name="gender" id="female">- In above example both inputs have same name ‘gender’ this leads to allow the user to select only one option out of them
- So this was all about how to make forms in Html, This is basic understanding of forms ,there are many more<input type=’’> available that our browser support, here we learned about normal input types which is use generally. we can use input types whatever we need, you can search over google for more information about input types
Some important input tag attributes —
- Placeholder
- Value
- Readonly
- Disable
- name
- Size
- Maxlength
- autofocus
- min
- max
- multiple
- type
How Form Submission work ?
So we have understand the basic concept of form, how form is created. Now we have to understand how form submission take place. but Before we are going to deep dive into Form Submission concept , its good thing to know about some common terminologiesies-
- what is Network protol ? let`s Understand it by taking Real life example — suppose i go to bank for depositing Cash i have to follow some set of rules for Depositing my cash like , Talk professionally , need to fill form , give form and cash to cashier etc — similarly over Network we have to define some set of rules (HTTP) for proper communication between two machines.
- HTTP (Hypertext Transfer Protocol) :- It is a Network protocol Which defines some set of rules for sending data over internet. it is used for transferring text, graphics, sound, video, and other files between web clients (such as browsers) and servers.
- Did you notice one thing ? Both HTML & HTTP have Common word ‘‘Hypertext’’, But what is Hypertext ?If we Understand in simple words its a Type of document which can link with other document(Two html document are linkable)
- HTTP provides some methods for transferring Data over internet, every method defines how particular data would be transfer.
-These are different methods provided by HTTP-
GET:
POST:
PUT:
DELETE:
HEAD:
OPTIONS:
TRACE:
CONNECT:- For now You Don`t need to study about these all methods We would only discuss about GET & POST methods Which is used by HTML form.
- GET Method :- If we set Form method to ‘‘GET ’’then What its Meaning ? After Submitting the form GET method sent Form Value Through a URL .And we can see form values in the address bar of the browser tab also. This URL data can be Cache or save in History of Browser, That’s why we will send only non-secure data not sensitive data using GET
<body>
  <form method="get" style="margin: 5rem;" >
   {Our code}..........
   </form>

</body>

</html>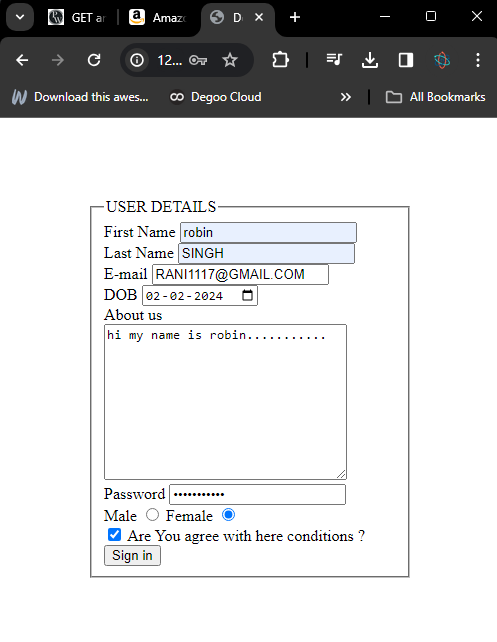
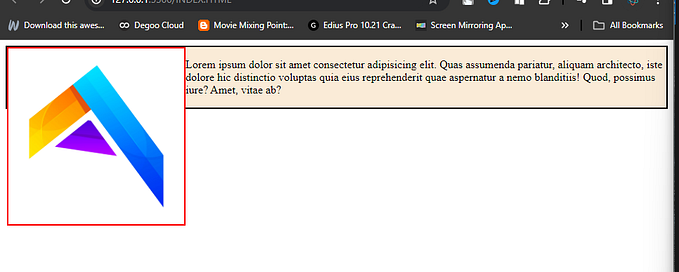
- After Clicking Sign in Button — URL look like !
http://127.0.0.1:5500/INDEX.HTML?Fist+Name=robin&Last+Name=SINGH&E-mail=SAPNARANI1117%40GMAIL.COM&DOB=2024-02-02&About=hi+my+name+is+robin..&password=dgtgtgftfg&gender=on- In above URL one thing You notice ?all Values of Form are Visible correctly in URL except one Gender . once look at the end of URL, here written ‘’gender = on’’ with this we can`t identify what exactly user put Male or Female
- We can fixed this By adding ‘value ’attribute in case of Radio buttons. as show Below
<label for="male">Male</label>
      <input type="radio" name="gender" id="male" value="male">
<label for="female">Female</label>
<input type="radio" name="gender" id="female" value="female">- POST Method:-Unlike the GET method , the POST method prevents form values from appearing in the address bar of the browser tab after the form has been submitted. This uses ‘Request Body’ to send data to server site. This request body can`t be save in History of Browser or Cache. This method is more secure than the first one.
- Apart from ‘Method’ an Action attribute is also available which we can use to give route to each form in case of when Multiple forms are available, So that at server side we can handel each form separate by using there route
So this was all about GET and POST we studied how they actually they are work ! but one question must have arise in your mind ,if we want to use another HTTP methods like DELETE etc and our html does`t support these methods then how we use these ? In this case we have to use JAVA Script Which we discusse later.
➡️The Select Element
The select element creates a dropdown menu for the user. It is useful when you have a predefined list of options for the user to choose from.
<select name="fruits">
      <option value="apple">Apple</option>
      <option value="banana">Banana</option>
      <option value="cherry">Cherry</option>
</select>